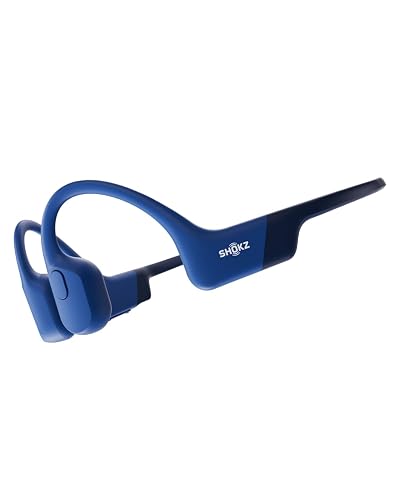
 By Ethan Brooks
Updated November 2026
Learning how to wear bone conduction headphones correctly comes down to three things: placing the transducers on the right spot of your cheekbone, setting the band to the right tension, and checking that the sound reaches you clearly. Once you get those right, the headphones should feel secure, stay comfortable for long sessions, and deliver audio without much effort on your part. This guide walks through each step, along with the mistakes that cause most fit problems.
What Bone Conduction Headphones Do Differently
Bone conduction headphones skip the ear canal entirely. Instead, small transducers rest against the cheekbone just in front of the ear and send vibrations through the skull to the inner ear. Your ear canal stays open, so you can still hear traffic, conversations, and other ambient sound. That open design is the main reason people choose them for running, cycling, and work situations.
Shopping for one? See our guide: 8 Best AfterShokz Titanium Wireless Bone Conduction Headphones Compareds.
Because the sound depends on contact with bone, fit matters more than it does with earbuds or traditional over-ear designs. A small shift of a few millimeters can change bass output and volume noticeably. If you want background on the design itself, see Open-Ear and Bone Conduction Headphones Explained for how the open-ear category compares to other styles.
Before You Put Them On
Start with a quick check so you know what you are working with. Look at the band, the transducer pads, and the housing for any debris, sweat residue, or dried product. Wipe the transducers with a dry microfiber cloth. Residue on the contact points reduces vibration transfer and can make sound feel thin. 25 Best Bone Conduction Headphones goes further into this.
Next, check the band. Most models use a flexible band that can be stretched gently to adjust size. Some have a sliding or clicking adjustment. Know which type you have before you start, because forcing a band that is not designed to stretch can damage the hinge or the internal wiring.
If your model charges through a dedicated cable, make sure the battery is charged before fitting. Low battery can reduce output and make it harder to judge whether the fit is right. For charging-related questions specific to one brand, the guide Onn Bone Conduction Headphones Charger: Step-by-Step Charging Guide covers the process in detail.
Step-by-Step: Putting Them On
- Hold the headphones with the band open. Keep the transducers facing inward toward your face. Left and right sides are usually marked, often with an L and R on the inside of the band or on the housing.
- Place the band behind your head. The band should sit across the back of your head, just above the neck, and not down on the nape. Band position on the back of the head affects how the transducers press against your face.
- Position the transducers in front of your ears. Place each transducer on the cheekbone, just in front of the ear opening and slightly above the jawline. Aim for the flat, bony area you can feel when you clench your jaw. Avoid the soft tissue near the jaw muscle, which absorbs vibration.
- Tighten or adjust the band. The band should feel snug enough that the transducers stay in place when you move your head, but not so tight that it pinches or causes a headache.
- Test the sound. Play a familiar track with clear vocals and some bass. Shake your head gently from side to side and up and down. If the sound drops out or changes significantly, adjust the transducer position.
- Fine-tune the volume. Start at a moderate level. Bone conduction typically sounds softer than in-ear designs, so many people find they need a bit more volume than expected, but high volume increases fatigue.
Finding the Right Transducer Position
Placement is the step most people get wrong. A useful way to find the right spot is to move the transducer slowly while a track plays, stopping when the bass sounds fullest and the vocals sound clearest. Mark the spot mentally, then keep the band tension consistent so you can repeat it each time.
Most users find the best position sits roughly one finger width in front of the ear canal opening, but anatomy varies. Facial structure, hair, and glasses all affect where the transducer can make solid contact. If your glasses arms sit on the same spot, some people wear the headphones over the arms or adjust them slightly forward or back.
Checking Contact Quality
You can often tell whether contact is good by sound alone. Thin or tinny audio, weak bass, or a sense that the sound is coming from far away usually means the transducer is not pressing firmly enough or is sitting on soft tissue. A slight buzzing or rattling sound can mean the transducer is pressing too hard on a bony ridge, or that the band is loose and letting the housing move.
Fit Factors That Change the Result
| Factor | What to Check | Typical Adjustment |
|---|---|---|
| Head size | Band sits without pinching or sliding | Stretch the band gently or use the adjustment slider |
| Hair | Hair under the transducer reduces contact | Tuck hair back or wear a headband underneath |
| Glasses | Arms conflict with the transducer position | Move transducers forward slightly or wear the band over the arms |
| Helmet or cap | Band shifts or pinches | Adjust tension after putting on the helmet, not before |
| Movement | Sound drops during running or head turns | Increase band tension slightly or reposition the transducer |
Common Mistakes
- Wearing the band too low. Placing the band on the neck instead of the back of the head weakens contact and makes the headphones slide.
- Setting the transducers on the ear. The transducer should sit on the cheekbone, not on the cartilage of the ear. Cartilage does not transmit sound well.
- Overtightening the band. Too much pressure causes headaches and discomfort after an hour or so. Aim for secure but relaxed.
- Ignoring sweat and skin oils. Clean the transducers regularly. Buildup changes contact and can irritate the skin.
- Turning volume up to compensate for poor fit. Fixing placement usually gives better sound and less strain than raising volume.
- Stretching a band that is not designed to stretch. Check the manufacturer’s guidance first.
Tips for All-Day or Active Wear
- Take a short break every hour or so to relieve pressure on the cheekbone.
- If you run or cycle, do a few test head movements before you start moving fast, so you can catch any slippage early.
- Keep the transducer pads dry and clean after workouts. Sweat can reduce grip and affect hygiene.
- Store the headphones with the band open and relaxed, not folded tightly, so the band keeps its shape.
- If you have any pain, numbness, or persistent discomfort near the jaw or ear, stop using the headphones and consult a healthcare professional.
Recommended gear
A few accessories can make fit and upkeep easier, though none are required.
- Microfiber cleaning cloth: A soft, lint-free cloth removes oils and sweat from the transducers without scratching the surface. View on Amazon
- Sweat-resistant headband: A thin headband worn under the band can help if hair interferes with contact, and it absorbs sweat during workouts. View on Amazon
- Protective carrying case: A hard or padded case protects the band from bending out of shape when not in use. View on Amazon
FAQ
Should bone conduction headphones feel tight?
They should feel secure, with the transducers staying in place when you move your head. They should not pinch, hurt, or leave deep marks. Mild pressure on the cheekbone is normal.
Why does the sound cut out when I move my head?
The transducer has probably shifted off its contact point or the band is too loose. Adjust the band tension and reposition the transducer on the flat part of the cheekbone.
Can I wear bone conduction headphones with glasses?
Yes. Many people wear them with glasses. You may need to move the transducers slightly forward or wear the band over the glasses arms to keep solid contact.
Do bone conduction headphones work with a helmet?
Many do, but you should put the helmet on first and then adjust the band. Fitting the headphones before the helmet often leaves the band too loose or shifted.
Why is the bass weak?
Weak bass usually means poor contact or a transducer sitting on soft tissue. Try repositioning the transducer slightly and tightening the band. Make sure the battery is charged, as low power can also reduce output.
Do I need to wear them at high volume?
Not usually. If you feel you need high volume to hear clearly, check the fit first. Good contact generally produces clearer sound at moderate levels.
Are they safe to wear for long periods?
Many people wear them for extended sessions, but taking breaks, keeping volume moderate, and avoiding excessive pressure are sensible habits. If you have concerns about hearing or physical discomfort, consult a healthcare professional. For more on this topic, see Bone Conduction Headphones Side Effects: What to Know and How to Reduce Them.
Conclusion
Wearing bone conduction headphones well is mostly about placement. Set the band behind the head, position each transducer on the flat part of the cheekbone just in front of the ear, and adjust the tension until the fit feels secure without pressure. Test the sound with head movement, and fine-tune until bass and vocals sound full and stable. A few minutes of adjustment at the start usually makes the difference between a frustrating experience and a comfortable, reliable one.
Related reading
- Raycon Bone Conduction Headphones: Fit, Features and How to Choose
- Bone Conduction Headphones Side Effects: What to Know and How to Reduce Them
- Top 9 Bone Conduction Headphones Underwaters for Swimming and Water Sports
- Top 8 Bone Conduction Headphones Mic Picks for Work Calls and Driving
Ready to choose one?
About Ethan Brooks
Ethan Brooks is part of our editorial team and reviews and edits our headphone tech & types guides, checking product details against manufacturer specifications and owner feedback.